- Like
- SHARE
- Digg
- Del
- Tumblr
- VKontakte
- Flattr
- Buffer
- Love This
- Save
- Odnoklassniki
- Meneame
- Blogger
- Amazon
- Yahoo Mail
- Gmail
- AOL
- Newsvine
- HackerNews
- Evernote
- MySpace
- Mail.ru
- Viadeo
- Line
- Comments
- Yummly
- SMS
- Viber
- Telegram
- JOIN
- Skype
- Facebook Messenger
- Kakao
- LiveJournal
- Yammer
- Edgar
- Fintel
- Mix
- Instapaper
- Copy Link
|
How To Create and Format Hard Drive Partition: Overview
Creating and formatting a hard disk partition in Windows 7, Vista, and previous Windows operating systems is actually a pretty straight forward process.
To familiarize yourself with formatting and partitioning we first provide answers to common hard drive partitioning and formatting questions in our frequently asked questions section, and then we show you step by step how to partition and format a hard drive in Windows 7 and Vista.
There are actually only a few basic requirements that must be met before you can create and format hard drive partitions.
First you must be logged into the computer under an account with administrator privileges, and secondly the hard disk simply needs to have unallocated/free disk space.
Note: You cannot format a disk partition that contains the Windows operating system.
In the event that your hard drive is already formatted to capacity and you do not have unallocated space available, what you can do in these situations is shrink an existing volume to make space for a new partition.
In pre Windows Vista and Windows 7 operating systems such as Windows XP or 2000, shrinking a volume had to be performed via 3rd party tools that typically required purchasing such as Partition Magic. With Windows 7 and Vista however, both operating systems actually have a very handy shrink volume feature integrated right into them. The shrink volume feature works fairly well in Vista, but in Windows 7 it actually works even better. Click here if you want to learn how to shrink a hard drive volume.
We hope you enjoy our format hard drive guide!
Windows 7 & Vista Format Hard Drive and Partition FAQ
When and why do I need to format hard drive/drives?
Typically you will need to format a hard drive anytime you add a new one to your computer. Formatting is also done when the hard drive is inaccessible, corrupted or infected with virus. Formatting a used drive will remove the existing data which means if you format the drive without backup you will have to recover data from formatted hard drive before you start using it. Formatting a hard drive is required since a file system such as NTFS or FAT32 is needed before you can add files on the drive. During the initial format hard drive setup process you must select a file system before formatting the drive or else an operating system such as Windows 7 or Linux will not recognize the drive. Sometimes a drive will come pre-formatted with a file system though this isn’t always the case so a format is necessary.
What must I do before I format a hard drive?
Before you format hard drive/drives you will need to create at least one partition on the drive. Once a hard drive has been partitioned you can then proceed to format each partition with a file system of your choice. Hard drives can contain multiple partitions/volumes and each volume can be assigned its own drive letter.
What exactly is a partition or volume?
Partitions are an area allotted on a hard disk that can be formatted and assigned a unique drive letter. For example a typical system partition on a computer is normally assigned the drive letter C and floppy drives typically use A and B. On your typical hard drive a volume is a formatted primary partition or logical drive. Both terms partition and volume are used interchangeably so keep that in mind for you may see a reference or speak to an IT person, etc. who may use either term.
How do I create additional partitions on a hard drive?
You can create additional partitions/volumes only if a hard disk contains unallocated space/unformatted space that is not part of an existing partition/volume. Typically a new hard drive is ready out of the box for you to start creating multiple partitions, however if your system is already partitioned and formatted to capacity and you want to add a new partition/drive letter, you will need to shrink that volume to create space for the additional partition/volume.
In Windows 7 and Windows Vista you can use Disk Management in the Computer Management app to shrink a volume or if preferred you can use a third-party partitioning tool such as Partition Magic or GParted. Third party tools such as GParted, etc. will need to be used to shrink a volume in Windows XP. Click Here to access a Microsoft page with basic instructions on how to shrink a volume in Windows 7.
What file system should I use when I format hard drive in Windows?
This depends on the Windows version for not all Windows versions support all file systems, however in more modern Windows operating systems such as Windows XP, Vista, and Windows 7, NTFS is the preferred file system of choice. Windows versions prior to Windows XP did not support NTFS and so the FAT32 files system was typically used. Click Here to jump to Microsoft’s website if you want to learn how to convert a hard drive to FAT32 in Windows 7.
What exactly is a quick format in comparison to a standard format?
The quick format option only creates a new file table on a hard drive instead of fully erasing the hard disk. Quick format is a great option for it is far faster than a standard format. Since erasing a disk entirely is not usually needed to begin using a new partition/hard drive, quick format is normally preferred because of its speed.
Is reformatting a hard drive different than formatting a hard drive?
When you reformat a hard drive you are essentially doing no more than formatting a drive that has previously been formatted. There is no real difference to reformatting a drive compared to formatting a drive for the first time. Like formatting a drive for the first time, reformatting deletes all data on the hard disk also. Often you perform a reformatwhen you no longer need the data on the drive or you are planning on reinstalling your operating system from scratch.
How do I add a new hard disk to my computer?
Adding the hardware is a pretty straight forward process for internal hard drives on most computers, though always reference the hard drives installation guide or your computer documentation if you are not sure how. External hard drives are usually easier and about as straight forward as they come. Typically all you need to is plug the drive in an available USB port and Windows 7 or Vista will normally recognize the new drive without a hitch.
If a new hard drive is not partitioned and formatted out of the box, you will need to create a partition and format the drive using the Disk Management app within the Windows Computer Management utility. We are going to show you how to do partition and format a drive.
How to Create and Format Hard Drive in Windows 7 & Vista
How-to Format Hard Drive Step by Step:
Step 1: Format Hard Drive Guide – Step 1
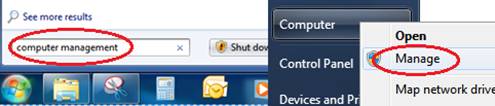
Open Computer Management. One way to access Computer Management is to use the Windows 7/Vista instant search feature built into the start menu and simply type “Computer Management” in the search box and then hit enter on your keyboard. Another way is to access Computer Management via the Windows control panel or best yet our preferred way is to right click on “Computer” on your start menu or desktop and select manage from the list of options.
Step 2: Format Hard Drive Guide – Step 2
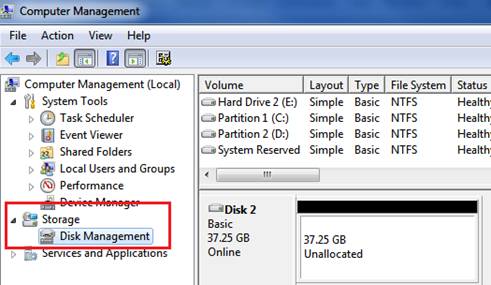
Once in the Computer Management application, choose the Disk Management option under Storage on the left hand pane.
Step 3: Format Hard Drive Guide – Step 3
Right click on unallocated section of your hard drive and choose the New Simple Volume option.
Step 4: Format Hard Drive Guide – Step 4
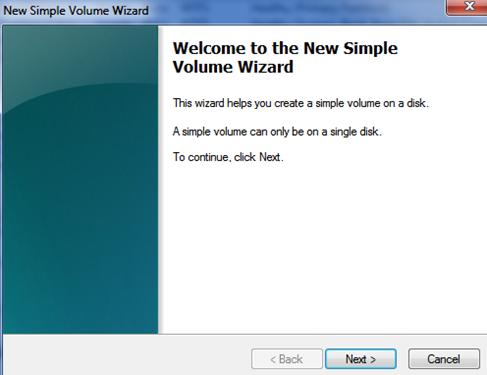
Once the New Simple Volume Wizard launches click next to continue.
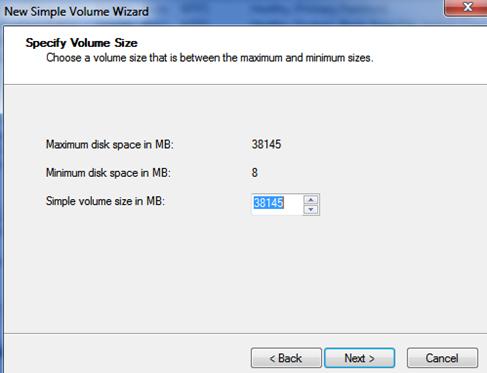
Step 5: Format Hard Drive Guide – Step 5
If you want to use the full capacity of the drive and create only one partition simply click next since this is the default. If you want to create a custom sized partition go ahead and type the size of the partition that you want to create in megabytes (MB) and then click next.
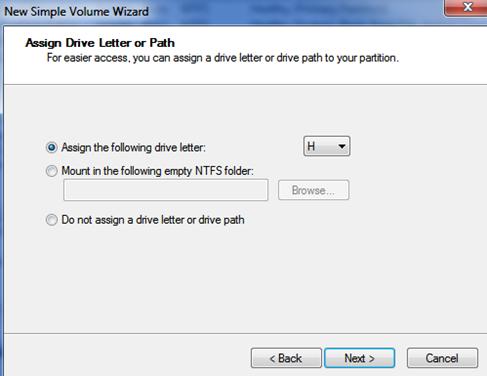
Step 6: Format Hard Drive Guide – Step 6
Now select either the default drive letter assigned by the wizard or if preferred select a desired drive letter of your choice and then click next.
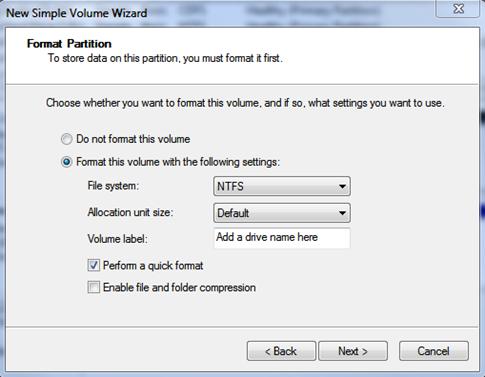
Step 7: Format Hard Drive Guide – Step 7
In the format hard drive wizard you now need to select formatting options for the newly created partition. For most of you the wizards default file system, allocation unit size, and quick format option will be perfect. The only thing you may want to change is the Volume label, so go ahead and give your new drive a name.
If you prefer to format hard drive later you can select “Do note format this volume”, though it is usually best to take care of formatting now to get it over with, plus you can’t use your new drive anyways without formatting it. We’re not going to get into details, though we also advise against enabling file and folder compression. Once you have all options set simply click next.
However, for those of you who may want to tweak your formatting options here are our recommendations. In Windows 7, Vista, and XP we recommend choosing NTFS as the file system for new hard disks. We’re not going to get into too many details here, though in a nutshell NTFS offers more features over FAT and FAT32 file systems including increased security, file by file compression, quotas, and even encryption. And of course the NTFS file system is also required for drives over 32GB in capacity which pretty much is every drive on the market so you may not have much of a choice anyways.
For smaller removable drives such as USB thumb/flash drives a FAT file system such as FAT16 or FAT32 may sometimes be a better choice. The FAT16 file system for example is compatible across a wide variety of older Windows operating systems including Windows 95/98/Me, and even older versions of Linux, etc. We’re assuming most of you aren’t going to run into these compatibility issues of yesterday so NTFS should work just fine, and well if it doesn’t simply go ahead and try one of the FAT flavors if available.
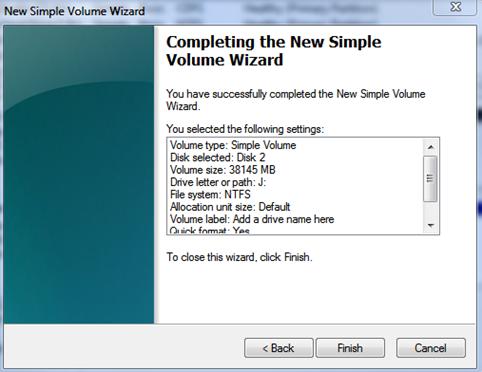
Step 8: Format Hard Drive Guide – Step 8
For this final step go ahead and review your format hard drive options chosen during the New Simple Volume Wizard and if you are satisfied click the Finish button to begin formatting.
That’s all there is to it, we hope you enjoyed our format hard drive guide and FAQ. Don’t forget to ask the computer tech if you have questions.

