Windows System Recovery Options Guide
Windows System Recovery Options Guide
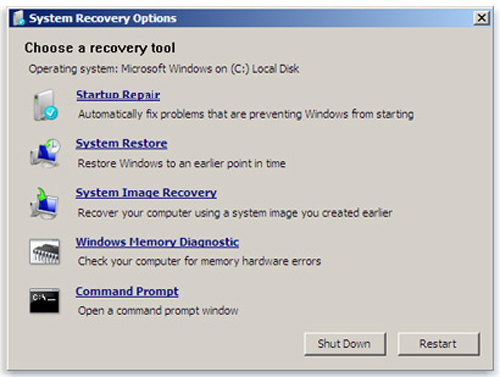
Windows System Recovery Options is a suite of several essential Microsoft tools used most often for troubleshooting startup problems for Windows 7 and Windows Vista. Using the system recovery options you can fix many Windows 7/Vista startup problems very easily.
Windows System Recovery options can be accessed via the Windows 7 Installation disk, the Windows 7 Advanced Boot Options menu, and also using a Windows 7 System Repair Disc.
A Windows 7/Vista System Repair disc is going to be the perfect addition to your PC technician toolkit; it allows quick troubleshooting of Windows startup problems without requiring you to use your Windows 7/Vista installation disc and potentially scratching it up during the day to day grind.
In this guide we are going to show you step by step how to create your own System Repair Disc and we will be over viewing each System Recovery Option recovery tools function.
Windows System Recovery Options - Jump Menu
Click on any recovery option below to learn more about it.
Other Selctions:
Startup Repair - Windows System Recovery Tool Overview:
The Windows System Recovery Startup Repair option is a quick way to fix various issues that may be preventing your Windows 7 or Vista installation from starting correctly. In a nutshell startup repair scans your computer for a potential startup problem and then tries to fix it so your computer can start normally.
Startup Repair isn’t a fix all solution but it can repair certain startup problems such as those caused by missing/damaged system files.
Using startup repair as a first option is a good starting point when troubleshooting Windows 7/Vista startup issues and if it doesn’t resolve the specific issues one of the other Windows System Recovery options at our disposal may just do the trick.
back to recovery options
System Restore - Windows System Recovery Tool Overview:
The Windows System Recovery System Restore option is very handy if you want to restore Windows 7/Vista to an earlier point in time without effecting your data files such as music, pictures, etc. This is the same handy System Restore feature available within Windows.
Having System Restore quickly accessible on your Windows 7/Vista System repair disc is very handy. Often a damaged Windows registry can prevent Windows from starting correctly and by using System Restore you can quickly replace the Windows Registry with a working version. In older Windows operating systems such as Windows XP restoring the Windows Registry was by no means this snappy.
(See our Windows 7 System Restore Guide for more details on this great tool.)
back to recovery options
System Image Recovery - Windows System Recovery Tool Overview:
The System Image Recovery Option allows you to restore Windows 7/Vista to a backup system image you may have created beforehand. A system image is an entire backup of a Windows configuration that includes the Windows OS, installed programs, user data and everything else, essentially an exact copy of a drive.
If you did in fact create an image beforehand, this option is great for you can restore your Windows 7/Vista installation back to the state it was at the time of the backup even if your physical hard disk fails. The other recovery options will not do you any good in the event of a failed hard disk, though with a system image you could easily replace the physical hard drive in your computer and then restore from the image.
We personally like to create a system image directly after installing a fresh installation of Windows containing only core applications, drivers, etc. If you are like us and restore your computer from time to time it is very snappy to restore from an image instead of performing a fresh installation. This type of imaging capability in older Windows versions required 3rd party tools such as Symantec Ghost, etc. It’s pretty nifty that Microsoft integrated basic imaging capability like this into Windows 7 and it is a great easy recovery option.
A system image also includes your data as it were at the time you created the image so a system image is yet another way for you to backup and recover some of our data if ever needed. You should of course always backup your data using a conventional backup method because a system image by default was technically designed to take a complete snapshot of your system opposed to giving you the capability to restore an individual file. There are ways to mount the .vhd file, etc. but a traditional backup is a much faster way to grab an individual file.
back to recovery options
Windows Memory Diagnostic - Windows System Recovery Tool Overview:
The Windows Memory Diagnostic Tool is used to scan your computer’s memory for errors. While not as widely used as some of the other Windows System Recovery tools, this tool can still be very useful for troubleshooting computer problems related to memory.
If the tool detects errors normally this indicates a problem with the memory chips or other piece of hardware. In this case you should begin memory troubleshooting steps and/or contact your computer manufacturer for information about possible fixes, etc.
back to recovery options
Command Prompt - Windows System Recovery Tool Overview:
The Command Prompt is an extremely useful tool that opens the door for advanced troubleshooting options for a failed Windows 7/Vista startup as well as many other Windows operating system issues.
Once in the command prompt you have a number of recovery-related and troubleshooting tools at your disposal. In fact, the extent of troubleshooting that can be performed with the Command Prompt is pretty vast. You can for example fix a drives master boot record, rewrite a new boot sector on a hard drive, check a disk for file system errors and much more.
If you work in the Information Technology field in computer repair you most certainly will find yourself at some point using the command prompt to troubleshoot Windows 7/Vista startup problems.
Thankfully Windows 7 and Vista is more robust than ever so startup issues are less common, but from time to time you may need to fire off a CHKDSK command to fix a computer’s file system corruption issue or you may find yourself fixing other startup issues via one of the many other command prompt tools available.
As you see the command prompt is a very handy Windows System Recovery tool. If you want to see the tool in action, be sure to check out our guide on how to fix the Windows 7/Vista BootMGR is Missing startup error, you may just encounter it in the field someday!
back to recovery options
How To Launch The Windows System Recovery Options Menu In Windows 7 and Windows Vista Operating Systems
How to launch Windows System Recovery options step by step:
Step 1:
Turn on or restart your computer with a Windows 7/Vista installation or system repair disc in your CD/DVD drive. If/when prompted, press any key to start Windows from the disc.
- Note: If your computer isn't configured to start from a CD or DVD, check the information that came with your computer for you may need to change your computer's BIOS boot drive settings. Click Here to access a Microsoft page with a basic BIOS overview if needed..

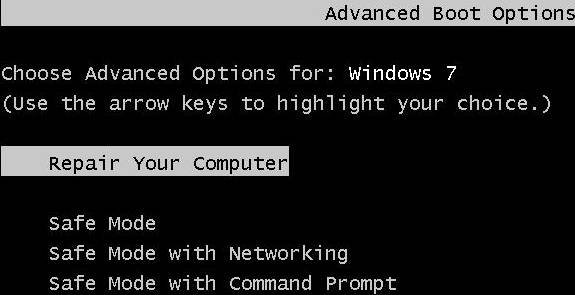
If you don’t have one of the aforementioned discs, you may be able to press and hold the F8 key on your keyboard as your computer is starting up from a powered off state and access the `Repair your computer’ selection via the Advanced Boot Options screen.
- Note: Not all systems have the `Repair your computer’ option available. This option is only available if you have the 100 MB System Reserved partition created during the installation of Windows 7. If you don’t have the option, Click Here to learn how to create your own Windows 7 System Repair disc.
Step 2:
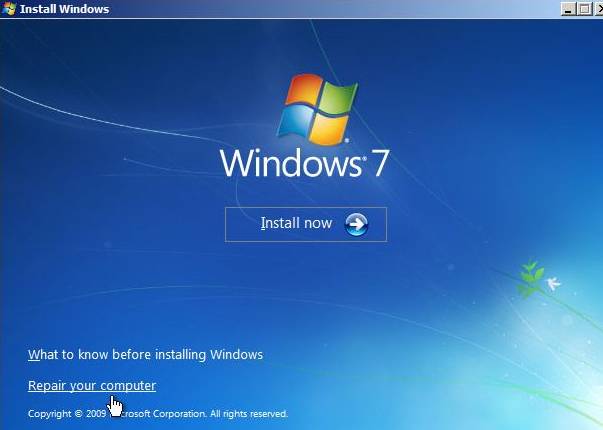
After you’ve successfully booted from the Windows 7 Installation/Repair disc simply choose your language settings and then proceed by clicking on `Repair your computer’.
Step 3:
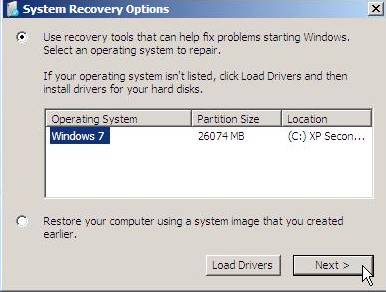
Select the Windows installation you want to repair, and then click `Next’.
Step 4:
Proceed to select your recovery option of choice.

back to top
How To Create A Windows 7/Vista System Repair Disc
Creating your very own Windows Vista/7 System Repair Disc can easily be done via any working Windows 7 computer. Once created the system repair disc is going to make accessing Windows System Recovery options to troubleshoot startup problems a snap!
How to create a Windows 7 system repair disc step by step:
Step 1:
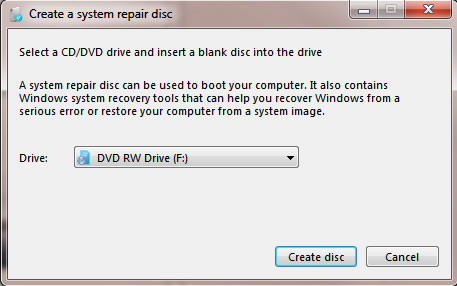
Type `system repair disc’ into the search box in the Start menu and hit enter on your keyboard to launch the create disc wizard.

Step 2:
Insert a blank CD/DVD drive into your system (CD works fine), select your drive, and finally click the Create disc button to begin the process.
back to top
Windows System Recovery Options - Conclusion:
We hope you enjoyed our Windows System Recovery options guide. Definitely check out some of our othe great Windows 7 articles below. If you have any questions please feel free to Ask The Computer Tech anytime.
See also:
Return
from Windows System Recovery Guide to Home Page
Contact us
|