Tweak The Windows 7 Taskbar
How To Customize The Windows 7 Taskbar To The Windows Vista/XP Look And Feel
In Windows 7 the all too familiar taskbar has been totally redesigned. The quick launch bar has been removed in favor of the new Windows 7 dock style taskbar in which docked application icons reside, and each time you open an application window it is also now combined within each of those icons each time the application is launched.
Essentially this newely designed Windows taskbar allows you to dock items similar to the MAC OSX dock, and both features of the classic taskbar and quick launch bar have now been combined in the Windows 7 taskbar.
This dock style Windows 7 taskbar is definitely one of the most visible changes made to Windows 7 from prior Windows versions such as Windows Vista or Windows XP. And while the new dock style taskbar takes a little time to get used to, once the learning curve is over it really does add a new element to Windows 7 giving it a more up to date feel, competing nicely with the Macintosh OSX operating system docking feature.
We highly recommend you give the new dock style Windows 7 taskbar a try, it really is a nice feature once you get used to it. On the other hand if you prefer the classic Windows Vista/Windows XP look and feel you can add the ole school taskbar and quick launch bar back in Windows 7.
In our first tutorial we show you step by step how to tweak the Windows taskbar to give it that classic Windows Vista/XP look and feel, and directly following in tutorial two we are going to show you step by step how to add the classic quick launch bar to your Windows 7 taskbar.
Tutorial 1 - How to give the Windows 7 taskbar the Windows Vista look and feel
In this step by step tutorial we show you exactly how to tweak the Windows 7 taskbar to make it look and feel very similar to Windows Vista and Windows XP. We do recommend you give the new Windows 7 dock style taskbar a try for it may just grow on you, though if you still prefer the old look and feel this tutorial will show you step by step exactly how to revert to this classic style. If combined with our first quick launch bar tutorial Windows 7 will have that true Windows Vista/XP look and feel.
How to give the Windows 7 taskbar the classic look and feel step by step:
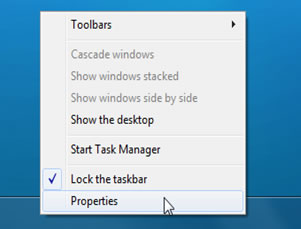
Right-click on an open area of the taskbar and choose Properties from the presented menu.
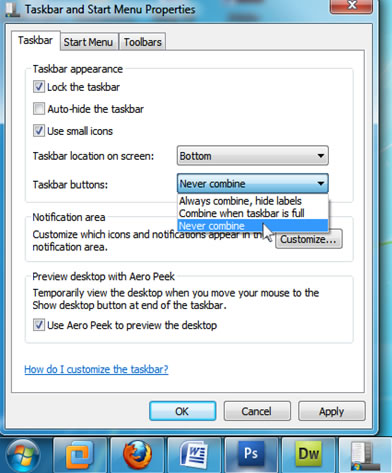
Once in the Taskbar and Start Menu Properties window, use the drop down menu in the taskbar buttons section and change it to “Never combine”. What this does is make every window show up as a separate button on the taskbar. If you prefer you can also choose the “Combine when taskbar is full” option and the “Use small icons” option.
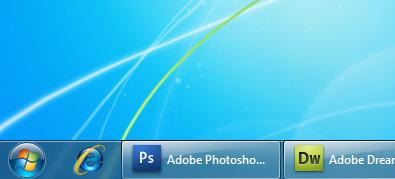
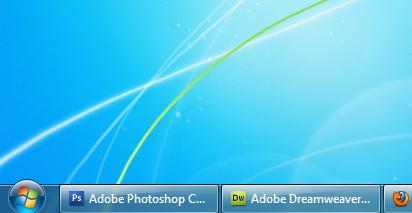
Once done you will notice that the buttons show text labels similar to Windows Vista & XP.
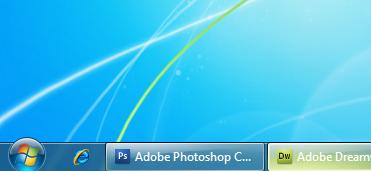
If within the Taskbar and Start Menu Properties window you chose to select the “Use small icons” check box to shrink down the icons they will appear even more similar to Windows Vista & XP as shown in the screenshot below. This is a great option if you are trying to give the Windows 7 taskbar that complete classic Vista/XP look and feel.
If you want to further dumb down Windows 7’s look and feel to appear yet more similar to Windows Vista and Windows XP, right-click on any docked applications and choose “Unpin this program from taskbar” from the menu selection. Now with pinned items missing your taskbar will look just like Windows Vista/XP.

Once all changes have been completed notice how Windows 7 looks and feels just like Windows Vista.
Tutorial 2 – How to add the classic Windows quick launch bar to Windows 7
In this second step by step tutorial we are going to show you exactly how to add the classic Windows quick launch bar back to the windows 7 taskbar. To completely tweak the Windows 7 taskbar to act very similar to Windows Vista or XP remember to check out the instructions in tutorial 1 if you haven't done so already for in combination with this tutorial that classic look and feel is only a few mouse clicks away.
How to add the classic quick launch bar in Windows 7 step by step:
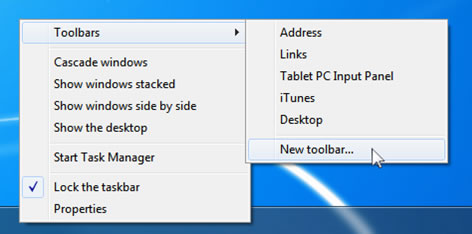
To add the quick launch bar back begin by right-clicking on an open area of the taskbar and remove the check mark next to Lock the taskbar. Then right-click on the taskbar again and choose Toolbars > New Toolbar… from the menu.
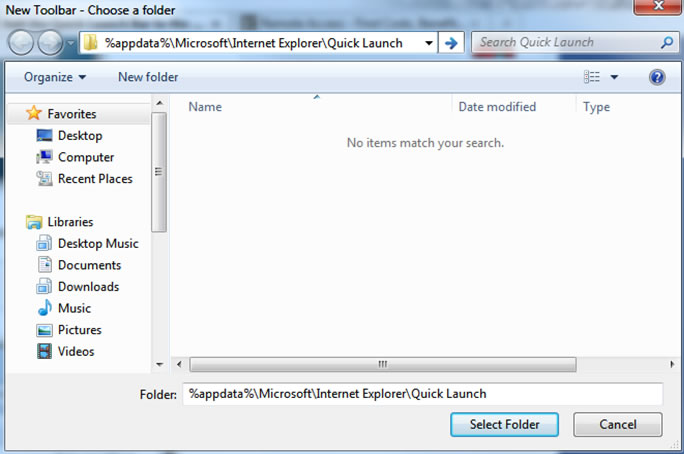
When asked to choose a folder for your new toolbar simply paste the following path shown below in bold into the Folder box in the New Toolbar – Choose a folder window and hit enter on your keyboard. After you hit enter on your keyboard it will open that location. Proceed to click the “Select Folder” button at this point to create a quick launch folder on your taskbar.
%appdata%\Microsoft\Internet Explorer\Quick Launch
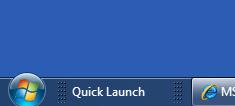
You should now notice the Quick Launch bar on the right of your taskbar similar to the screenshot below. If you unlocked the taskbar in the first step, you should now click on the dotted lines and drag the toolbar all the way to the left. If it doesn’t drag right away just keep playing with it by dragging the dotted lines until you get it to the left. Note: You may need to play with the dotted lines by the regular taskbar toolbar items too to get the quick launch on the left.

Once successful your Quick Launch bar should be on the left next to your start button. If necessary use the dotted lines to also adjust the regular taskbar toolbar to be closer to the left as you see in the screenshot below.
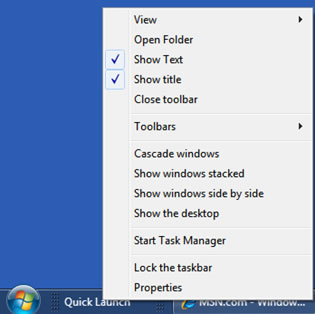
Now right-click on the quick launch toolbar you’ve just added and uncheck both “Show Text” and “Show Title” from the menu. After this go ahead and lock the taskbar if you are satisfied.
That’s all there is to it. Now feel free to drag any programs icons that you want from your start menu into the newly created quick launch bar.

Conclusion:
We hope you enjoyed our Windows 7 taskbar tweaking tutorials. Remember to fill out our contact form anytime you want to ask the computer tech questions.
See also:
Return
from Windows 7 Taskbar & Quick Launch Bar Tweaks to Home Page
Contact us
|